Experimental methods#
Tutorial paper about cyclic voltammetry and electrochemistry A Practical Beginner’s Guide to Cyclic Voltammetry
Available materials#
Cell materials:
Substrate (FTO)
Counter electrode 1 for deposition (carbon paper or small piece of graphite)
Counter electrode 2 for activity (larger graphite rod)
Plastic vial (20 mL)
Clamps
Three-neck flask
Cork ring and stage for cell
Reference electrode (keep in water always)
Metal salts:
Iron(X) nitrate (Fe(NO3)x x nH2O ) (Sigma Aldrich, xx%) or sulphate
Manganese(II) nitrate (Mn(NO3)x x nH2O) (Sigma Aldrich, xx% )
Cobalt(II) nitrate (Co(NO3) x nH2O) (Sigma Aldrich, xx%)
Nickel(II) nitrate (Ni(NO3)x x nH2O) (Sigma Aldrich, xx%)
Electrolyte salts:
KOH (note glass leaches above pH 12)
NaOH
Sulphates
Phosphate salts
Perchlorate salts
Cleaning procedure#
Before any glassware can be used for clean electrochemistry, it needs to be cleaned by us thoroughly. We use potassium permanganate to oxidize any organic compounds and dilute piranha solution (sulfuric acid + hydrogen peroxide) to dissolve any inorganic impurities. The name piranha refers to the similarities with a real piranha when organic material comes into contact with the solution. These chemicals are therefore really dangerous and you should be really careful not to spill and damage your clothes.
Store glassware in a 1 g/L KMnO4 + 0.1 M H2SO4 solution for 2-3 h.
Pour out KMnO4 solution for reuse into storage vat
Rinse glassware 3x with DI water (dispose of very dilute KMnO4 in sink)
Soak in dilute piranha (~5 mL H2SO4 + ~5 mL H2O2 in 3 L beaker) for 20 minutes
Dispose of dilute piranha by neutralizing with sodium carbonate in a seperate bucket
Rinse 3x with DI water
Boil in DI water 3x
After the cleaning procedure, our glassware remains clean. However, everything else it not clean. In electrochemistry we have to be really careful what touches what. Except for the cleaning procedure, the chemicals we are using are not extremely dangerous. Therefore, gloves are worn more to protect the cleanliness of the experiment than for the safety of ourselves. Therefore we also have to keep our gloves spot clean and only touch the outside of glassware and only use clean glassware (really clean).
Every consumable like glass vials, gloves, pipette tips and centrifuge tubes are made sterile and therefore clean enough for our experiment. We can use these however much we like. Solvent bottles are also clean, and we should make sure they stay clean and avoid cross contamination.
Preparing electrolyte solutions#
DO NOT USE UNCLEAN GLASSWARE, DO NOT USE METAL SPOONS, DO NOT USE NEEDLES, DO NOT USE SOLVENT BOTTLES, DO NOT PUT CHEMICALS BACK INTO THE CONTAINERS.
Make sure you have a clean beaker or flask to measure out the water
Do not use spoons but use clean pipette tips only touched by gloves to weigh out chemicals on clean surfaces and do not put chemicals back into their packaging. If you weigh too much, make more solution or dispose in trash/chemical waste.
Only use cleaned glassware and disposable syringes (no needles) to make electrolyte solutions
Make electrolyte directly in the cell
Catalyst electrodeposition#
Now that you have read Morales-Guio et al. (2016), it is time to perform our own electrodeposition experiments and analyze the materials. To do this, you will first need to derive and develop a step-by-step protocol for both the electrodeposition as well as the electrochemical analysis. An experimental protocol is a detailed plan that describes the steps you will take to form this catalyst and analyze this. An experimental protocol should leave little room for interpretation. Take into account that your setup and chemistry will be slightly different than in the literature, as this is dependent on available materials.
Task description#
Prepare a 50 mM solution of the metal nitrates (or Fe sulphate) in the desired ratio. If necessary, adjust the pH with citric acid until it is (slightly) below 8. Deposit the metal(s) on FTO glass (hint: use tape to raster off the active area) under a N2 atmosphere and with a carbon counter electrode (CE), by applying a current density of -1 mA/cm2 for 10 s. Rinse the deposit with 0.1 M KOH or NaOH and demi water.
Setting up a three-electrode setup#
Setting up the electrochemical cell requires a specific order in order to protect the potentiostat and your working electrode. There is never any potential or current applied to the reference electrode, but it is needed for the potentiostat to ‘know’ at which potential it needs to keep the CE and WE so we connect the RE first. Then we connect the CE to have a ‘sink’ for the current to go if the potentiostat needs to get rid of current. When we connect our WE last, the potentiostat keeps the potential vs the RE stable and uses the CE to get rid of current when it needs to. Now when we connect the WE, there will never be any current/potential spike that could potentially be damaging to the electrocatalyst.
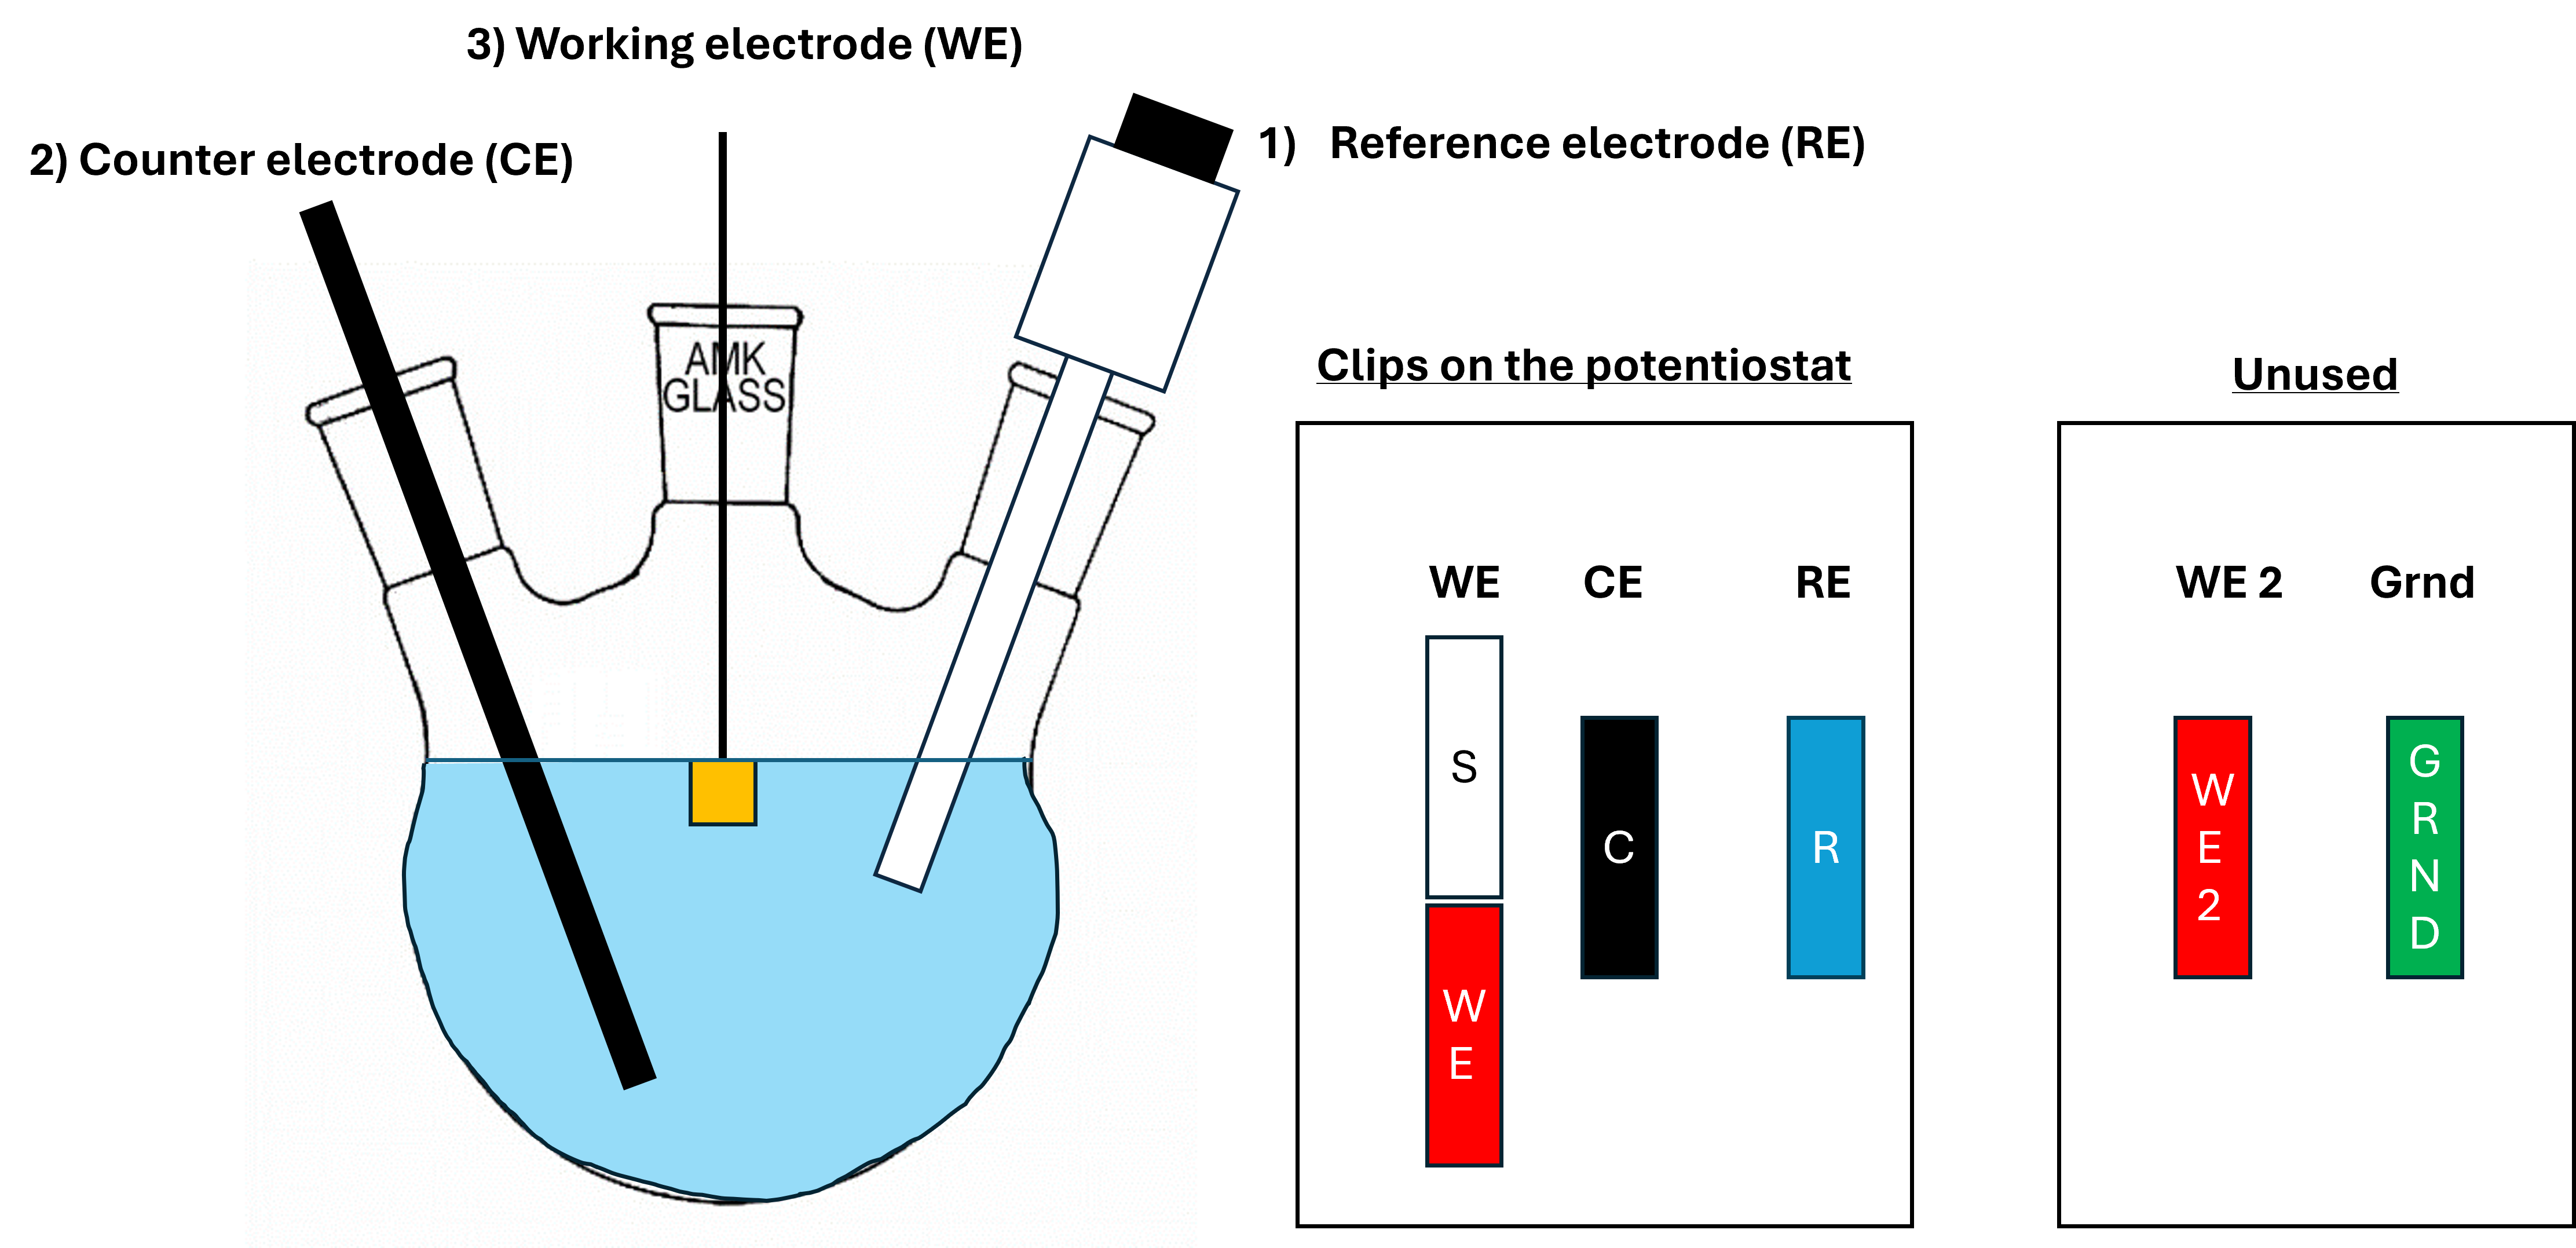
Fig. 5 A schematic display of the three-electrode setup with a working (WE), counter (CE), and reference (RE) electrode. The numbers indicate the order in which they need to be connected, and the colours indicate which clips are used to connect to the respective electrodes. 2 clips on the potentiostat are unused.#
Always rinse all electrodes with demi water before inserting into the cell
Fill cell with electrolyte
Rinse reference (hydroflex) and counter electrode (graphite) and insert into cell
Connect reference electrode
Connect counter electrode
Briefly anneal working electrode (if Gold)
Assemble working electrode
Submerge and connect working electrode
Make sure no electrodes are touching
Load appropriate potentiostat settings
Connect working electrode
Run measurement
Electrochemical methods#
Note, you can test all these parameters with a gold or carbon electrode which will not degrade.
Cyclic voltammetry (CV)#
Before any measurement measure ohmic drop (iR-drop) using impedance spectroscopy and measure the open circuit potential. (Check if possible with TA)
Make sure electrodes are connected properly
Check Open circuit potential (OCP/OCV), note in notebook
Select starting potential should be around 0.8 V.
Select highest vertex potential: look at values from literature, do not go above 2 V.
Select lowest vertex potential (should be > 0.4 V)
Select scan rate (mV/s) in the range of 5 - 250 mV/s
I range (1 - 10 mA), E step to 1 mV
Linear sweep voltammetry (LSV)#
An alternative to cyclic voltammetry. Scans from one potential to another in 1 sweep. Typically done at a very low scan rate < 10 mV/s.
Start at a stable potential from which you want to scan
Use chronoamperometry (CA) at a stable potential for max. 1 min
Follow same steps as CV except for lowest vertex potential
Chronoamperometry#
Applying a constant potential and measuring the current over a long time to estimate the activity and stability. This is usually used once the potential is found where the catalyst produces the highest activity rate.